Animations play a crucial role in enhancing user experience and making mobile apps more engaging. Flutter, Google’s UI toolkit for building natively compiled applications for mobile, web, and desktop, offers a powerful animation system that allows developers to create stunning custom animations. In this step-by-step guide, we will explore how to build beautiful custom animations in Flutter to take your app’s UI to the next level.
Table of Contents
Prerequisites
- Before we start, make sure you have Flutter installed on your system and a basic understanding of the framework’s fundamental concepts, such as widgets, state management, and gesture handling.
- Finally, but most importantly, muster up a small spark of interest in learning animation! Because once you see the widgets come to life with animation magic, that spark’s gonna grow into a blazing inferno of excitement!
In this guide, we are going to see how to implement animation in two kinds of tasks:
- Animated List
- Animated Loader
We are going to create a simple Todo app with Animated List and Animated Loader. So, saddle up, and let’s ride into the world of animating lists and loaders in Flutter! 🤠🐴.
Animated List
First, we will create a simple flutter list with animation, Animated List is a Flutter widget that allows developers to create dynamic and animated lists with smooth and visually appealing transitions. It is part of the Flutter animation framework and is an extension of the ListView widget. The Animated List automatically animates changes to the list’s content, such as inserting or removing items, providing an engaging and interactive user experience.
Key Features
Insertion and Removal Animations
When you add or remove items from the list, the Animated List animates these changes with predefined or custom animations, making the list’s modifications visually seamless.
Built-in Animation Controllers
Animated List comes with built-in animation controllers that handle the timing and ease curves of the animations, simplifying the process of creating smooth and fluid transitions.
Customizable Animations
While Animated List provides default animations, developers can also customize the animations to fit the app’s unique visual style and requirements.
Absolutely! Theory is essential, but practical examples bring concepts to life. So, let’s dive into a practical example of using an Animated List in Flutter.
Project Setup and Dependencies
To create our Flutter app, we’ll use Visual Studio Code as our development environment. If you’re not familiar with setting up a new Flutter project, don’t worry! You can refer to my previous blogs for step-by-step instructions. If you’re already comfortable creating Flutter projects, skip this part and proceed with the app development.
No need to install any external plugin to create an Animated List.
Create a Task Model
In this blog, we will focus more on animation, So we can keep the functionalities simple. Define a Task class that represents a single task with a title and status.
I created a file called todo_list.dart in the lib folder that will contain the Animated List. First I created a Simple class that represents a Task with title and status describing whether it’s completed or not.
todo_list.dart
class Task {
  String title;
  bool isCompleted;
  Task(this.title, this.isCompleted);
}
Create a Simple List with Animation
Technically our goal is to create a scrolling container that animates items when inserted or removed. This widget’s AnimatedListState can be used to dynamically insert or remove items. To refer to the AnimatedListState either provide a GlobalKey or use the static of method from an item’s input callback.
To do that, let’s create a StatefulWidget to create an Animated List.
todo_list.dart
// todo_list.dart
import 'package:flutter/material.dart';
void main() {
  runApp(TodoListApp());
}
class Task {
  String title;
  bool isCompleted;
  Task(this.title, this.isCompleted);
}

class TodoListApp extends StatefulWidget {
  @override
  _TodoListAppState createState() => _TodoListAppState();
}

class _TodoListAppState extends State {
  List tasks = [];
  bool isLoading = false;

  final GlobalKey _animatedListKey = GlobalKey();

  @override
  Widget build(BuildContext context) {
    return MaterialApp(
      home: Scaffold(
        appBar: AppBar(title: const Text('ToDo List')),
        body: AnimatedList(
          key: _animatedListKey,
          initialItemCount: tasks.length,
          itemBuilder: (context, index, animation) {
            return _buildTaskItem(tasks[index], animation, index);
          },
        ),
        floatingActionButton: FloatingActionButton(
          onPressed: _addTask,
          child: const Icon(Icons.add),
        ),
        backgroundColor: Colors.white60,
      ),
    );
  }

  Widget _buildTaskItem(Task task, Animation animation, int index) {
    return SizeTransition(
        sizeFactor: animation,
        child: Card(
          color: Colors.white,
          child: ListTile(
            title: Text(task.title),
            onLongPress: () => _removeTask(index),
          ),
        ));
  }

  void _addTask() async {
    Task newTask = Task('New Task ${tasks.length + 1}', false);
    tasks.add(newTask);
    _animatedListKey.currentState!.insertItem(tasks.length - 1);
  }

  void _removeTask(int index) async {
    _animatedListKey.currentState!.removeItem(index,
        (context, animation) => _buildTaskItem(tasks[index], animation, index));
    tasks.removeAt(index);
  }
}
Here, we used AnimatedList ( a default flutter package ). The AnimatedList class in Flutter is a powerful widget that allows us to create dynamic and animated lists with smooth transitions. It is an extension of the ListView widget, providing built-in animation support for adding, removing, and updating items in the list. The primary goal of AnimatedList is to enhance the user experience by animating changes to the list’s content, making the app feel more interactive and visually engaging.
AnimatedList has multiple properties or parameters that control various aspects of the widget’s behavior, appearance, and animations. Understanding and using these props correctly is crucial to achieving the desired behavior and visual effects in an AnimatedList. To know about the properties and behavior of AnimatedList please refer to the official documentation.
In this blog, we will be Focusing on Animated List and Animated Loader, If you are not familiar with the flutter basics ( Widgets, States, etc… ) I would recommend you to read my previous blog.
Animated Loader
A loader is commonly used to provide visual feedback to users while waiting for data to load, processing content, or completing network requests. Loaders help improve the user experience by giving a sense of activity and preventing the app from appearing unresponsive during waiting periods.
There are various ways to implement loaders in Flutter, including using built-in widgets, third-party packages, or creating custom loaders. Additionally, “animated loaders” add an extra touch of dynamism to the loading process by incorporating smooth animations.
Let’s add an animated loader in our TodoApp while creating and deleting a task.
Add Flutter Loader Package
flutter pub add loading_animation_widget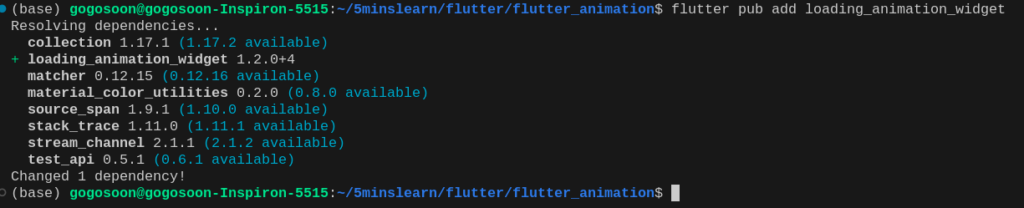
Implement AnimatedLoader
The loading_animation_widget package offers various loader animations that we can use to display loading indicators in our app. By importing the package, we gain access to these loader animations and can utilize them to enhance the user experience during loading operations or any other asynchronous tasks.
All loading animation APIs follow the same straight-forward implementation. There is a static method for each animation inside LoadingAnimationWidget class, which returns the Object of that animation. Both size and color are required some animations need more than one color.
loading_animation_widget offers multiple animated loaders with customized animation. Let’s explore a few of those and integrate into our Todo App.
Now I created a file called animated_loader.dart, which has AnimatedLoader Widget.
// animated_loader.dart
import 'package:flutter/material.dart';
import 'package:loading_animation_widget/loading_animation_widget.dart';

void main() {
  runApp(AnimatedLoader());
}
class AnimatedLoader extends StatelessWidget {
  @override
  Widget build(BuildContext context) {
    return MaterialApp(
      home: MyLoaderScreen(),
    );
  }
}
class MyLoaderScreen extends StatelessWidget {
  @override
  Widget build(BuildContext context) {
    return Scaffold(
      body: Center(
        child: LoadingAnimationWidget.staggeredDotsWave(
            size: 75, color: Colors.deepPurple),
      ),
      backgroundColor: Colors.transparent,
    );
  }
}
Let’s show this animated loader in our animated list while adding or removing a task.
todo_list.dart
import 'package:flutter/material.dart';
import 'package:flutter_animation/animated_loader.dart';
import 'package:loader_overlay/loader_overlay.dart';

void main() {
  runApp(TodoListApp());
}

class Task {
  String title;
  bool isCompleted;
  Task(this.title, this.isCompleted);
}

class TodoListApp extends StatefulWidget {
  @override
  _TodoListAppState createState() => _TodoListAppState();
}

class _TodoListAppState extends State {
  List tasks = [];
  bool isLoading = false;

  final GlobalKey _animatedListKey = GlobalKey();

  Future loadData() async {
    setState(() {
      isLoading = true;
    });
    await Future.delayed(const Duration(seconds: 2));
    setState(() {
      isLoading = false;
    });
  }

  @override
  Widget build(BuildContext context) {
    return MaterialApp(
      home: Scaffold(
        appBar: AppBar(title: const Text('ToDo List')),
        body: Stack(
          children: [
            AnimatedList(
              key: _animatedListKey,
              initialItemCount: tasks.length,
              itemBuilder: (context, index, animation) {
                return _buildTaskItem(tasks[index], animation, index);
              },
            ),
            if (isLoading)
              const Opacity(
                opacity: 0,
                child: ModalBarrier(dismissible: false, color: Colors.black),
              ),
            if (isLoading)
              Center(
                child: Center(child: AnimatedLoader()),
              ),
          ],
        ),
        floatingActionButton: FloatingActionButton(
          onPressed: _addTask,
          child: const Icon(Icons.add),
        ),
        backgroundColor: Colors.white60,
      ),
    );
  }

  Widget _buildTaskItem(Task task, Animation animation, int index) {
    return SizeTransition(
        sizeFactor: animation,
        child: Card(
          color: Colors.white,
          child: ListTile(
            title: Text(task.title),
            onLongPress: () => _removeTask(index),
          ),
        ));
  }

  void _addTask() async {
    Task newTask = Task('New Task ${tasks.length + 1}', false);
    await loadData();
    tasks.add(newTask);
    _animatedListKey.currentState!.insertItem(tasks.length - 1);
  }

  void _removeTask(int index) async {
    await loadData();
    _animatedListKey.currentState!.removeItem(index,
        (context, animation) => _buildTaskItem(tasks[index], animation, index));
    tasks.removeAt(index);
  }
}
To explore more Loader just refer to the docs. It has multiple loaders with customization.
Hurray! We can see that the Animation Loader and Animation List are rendering very smoothly, and they look even better!
If you are implementing this from scratch, I would appreciate it. However, if you prefer, you can also clone the repo from GitHub. Either way, I’m excited to see the Animation Loader and Animation List in action from you!
Note:
In the context of creating a task in real time, a loader might not be necessary since the creation of a task typically happens quickly and doesn’t involve any lengthy processes like fetching data from an API or performing complex computations. However, adding a loader during task creation can still be a useful visual cue to indicate that the task is being processed and provide immediate feedback to the user.
Conclusion
We explored the world of creating beautiful custom animations in Flutter, focusing on the implementation of Animated List and Animated Loader. By understanding the Animated List, we learned how to create dynamic and interactive lists with smooth item insertions and removals.
Through these examples, we witnessed Flutter’s ability to make animation implementation enjoyable and straightforward. By incorporating custom animations into our apps, we can create engaging and visually appealing interfaces that captivate users and set our apps apart.
If you wish to learn more about Flutter, subscribe to my email newsletter (https://5minslearn.gogosoon.com/) and follow me on social media.
Happy animating and Fluttering! 🚀