

Have you ever felt frustrated searching for files manually on your computer that too when you’re a Developer/DevOps engineer working on GUI-less Linux servers it’ll be too hard to find the files.
Most people are unaware of the power of Linux terminals. Linux has an incredibly powerful command that allows you to search files and directories in a fraction of a second. If you’re a beginner or an expert, looking to improve your file management skills to the next level, you’ve arrived at the right spot. This article will help you understand the basics of the most commonly used find command.
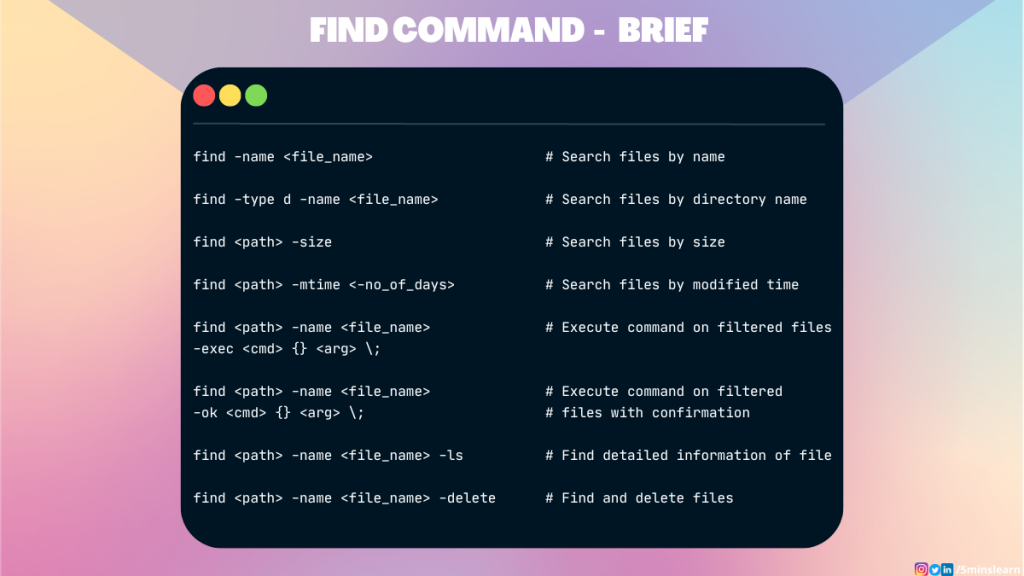
What is the find command in Linux?
Find command allows you to search for files and directories on your computer. find command provides the flexibility to search for files in a specific directory or recursively through all subdirectories.
Let’s explore the power of the find command
How to search a file by name
Let’s say you saved a file called hello_world.html somewhere and you don’t even remember the directory name. But your boss is asking you to send him the file immediately.
Usually, if we forgot where we stored the file, we will be going through folder by folder and check if the file exists. This is when find command does a great job for us. Instead of searching the file manually on your computer, you can use the find command to automate this.
By passing the name of the file using the -name flag, the find command searches and returns the location of the file.
find -name
But remember the -name flag do case sensitive search. If you are looking to do a case-insensitive search, you can use the -iname flag instead.


find -iname 

find command can also be used as an alternative to ls command in some places. Let’s assume you need to find all the files ending with an .txt extension. You can do so with the find command using the regex pattern (*.txt).
find /path/to/search -name "*.txt"

This command will list all the .txt files in your current directory and its sub-directories. To find .txt files in a particular directory and sub-directories you can replace the /path/to/search with the path of your directory.
How to find a directory
Searching a directory is possible by passing the d to the -type parameter in the find command.
find -type d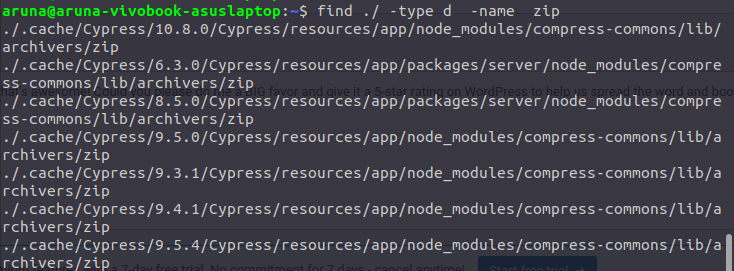
find commandIn the above screenshot, we’re finding a directory named zip from our current directory.
Similarly the -type option accepts other parameter options to simplify our finding process.
ffinds the list of regular filesbfinds the list of block devicescfinds the list of character deviceslfinds the list of symbolic linkssfinds the list of socketspfinds the named pipes
How to search a file by its size
Adding -size option along with find command helps us to find files based on size. Prepend a + or - to the size to represent greater than and less than respectively.
find /path/to/search -size 

In the above screenshot, we’re finding all the files having sizes greater than 1 GB.
You can also search for all files that fall within a specific size range.
For example, if you want to find all the files that are above 50 MB and below 100 MB, you can run the following command.
find /path/to/search -size +50M -size -100M

You can specify the size in your preferred notation. A few of the available notations are,
Krepresents KBMrepresents MBGrepresents GBbrepresents bytescrepresents blocks
How to search a file based on modified time
Every file has a created and last updated time associated with it. Let’s assume you have thousands of files in your directory. You edited a file in the past couple of days and forgot its name. You’re sure that, you have edited only a couple of files after that. In such cases, you can find all the files that are modified 7 days from now. This limits your search from 1000+ files to less than 10 files. You’ll be able to find the file you edited in seconds after running the command.
This is possible by passing -mtime parameter with the find command.
find /path/to/search -mtime 

Let’s assume another scenario, where today’s date is February 10, 2023. You modified a file before Feb 3, 2023. After Feb 3, 2023, you modified a lot of files. You have to find the file which you modified before Feb 3, 2023. So, basically, you need the files that are modified before Feb 3, 2023.
Weird scenario. Right?
But, this query can also be run using find command. You can achieve this by changing the negative sign(-) with a positive sign(+).
Here’s the modified command for you,
find /path/to/search -mtime +7How to execute a command on the filtered files from the find command
This question may confuse you. Before revealing the answer, let’s understand the question clearly with a real scenario. Let’s assume you have 1000 files in a directory and running the find command returns 20 matching files. You want to move these 20 files into a different directory. How can you achieve that?
Hope you understand the question clearly. Simply put, we have to run a command over each of the filtered files.
This can be achieved by passing -exec option with the find command.
The -exec option is used to execute a command on each file that is found in the search. The -exec option is followed by a command and its arguments, with the {} symbols representing the path of the file being processed.
The \; symbol at the end of the command line specifies that the -exec option has ended
To represent the end of the -exec command, we have to add \;(Backward slash and a semi-colon).
Here’s the syntax,
find /path/to/search -name -exec {} \;Let’s try to move the filtered files from 5minslearn directory to the zip directory.
Here’s the command,
find ./5minslearn -name "*.zip" -exec mv {} ./5minslearn/zip \;
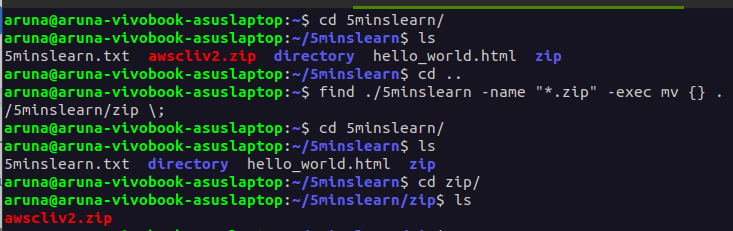
This command searches for all files with a .zip extension in the ./5minslearn directory and then moves each file to the ./5minslearn/zip directory.
The -exec option allows you to perform a wide range of operations on the files that are found. You can replace the move command from the above example by copying, deleting, or even changing the file permission command.
How to execute a command on the filtered files with a confirmation
Most people will prefer to use this if they’re not sure about whether to apply the operation on each file. The -ok option is similar to -exec option except that it will ask for confirmation before executing the operation on each file. This command is super helpful to review files that will be affected before executing the specific operation and you have the option to decline if you’re not sure or don’t wish to apply the command.
For example, this time let’s try to move the .txt files to the other directory.
find /path/to/search -name "*.txt" -ok mv {} /path/to/destination \;
The above command searches for all files with a .txt extension in the ./5minslearn directory and then prompts the user to confirm before moving each file to the ./5minslearn/text_files directory.
The -ok option is useful when you want to be cautious about the files you are modifying, as it allows you to inspect each file and its location before executing the specified command.
How to find a file with detailed information
The -ls option in the find command is used to display information about the files found in the search, in the format of the ls command. This option provides detailed information about the files, such as their permissions, owner, size, and modification time.
find /path/to/search -name "*." -ls
How to find and remove files
Have you ever been in a situation to find files and remove the files from your computer? The -delete option in the find command does the exact same thing. It allows you to delete files that match the specified criteria.
find . -name "*." -delete

In the above example, you can see that the find command deleted the files with .html extension
Note: This operation is irreversible. Be 100% sure when you run the delete operation.
I would advise running the find command without -delete flag at first and ensure that only the files that need to be deleted are shown. Once you’re sure, you can execute the same command appending -delete flag.
Conclusion
In this article, you learned how to search files effectively and perform various operations. These are very basic options in the find command, to learn more advanced options let me know in the comments section, and I’ll cover advanced options in my next blog
Subscribe to my newsletter by entering your email address in the below box to receive similar blogs in your inbox.
